|
CÛmo hacer cabello: Corto y ondulado. Nivel b·sico
How make hair: Short and wave. Basic level |
|
|
|
 |

1
2
|
|
Vamos a hacer esta melena ondulada corta simÈtrica y en postura est·tica
en menos de 10 pasos ^^ No es espectacular, pero nos ayudar· a comprender
los aspectos b·sicos de las luces y las sombras.
We are going to make this waved
short and symmetrical hair and in static position in less than 10 steps ^^
is not spectacular, but it will help us to understand the basic aspects of
the lights and the shades. |
Usaremos esta paleta de dos colores ^^
We will use this palette of two
colors ^^ |
|
 |
 |
|
Primero, creamos una nueva capa llamada "Pelo" (o como tu quieras) y
dibujamos  el espacio que ocuparÌa el pelo con el color 1, el m·s claro. Lo
dibujaremos con unas cuantas ondas para que le den m·s volumen. el espacio que ocuparÌa el pelo con el color 1, el m·s claro. Lo
dibujaremos con unas cuantas ondas para que le den m·s volumen.
First, we created a new called layer
ìHairî (or as your you want) and drew
 the space that would occupy the hair
with color 1, clearest. We will draw it with a few waves so that they give
it more volume. the space that would occupy the hair
with color 1, clearest. We will draw it with a few waves so that they give
it more volume.
|
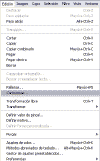
Segundo paso: repasar el contorno. Para hacerlo m·s f·cil, si tienes photoshop es usar la opciÛn Contornear. (Debajo)
Second step: to review the outline.
In order to do it easiest, if you have photoshop it is to use the option
Outline. (Below)
 |
La contornearemos con la opciÛn "dentro" con el color 2 (el m·s oscuro) a
un grosor de 1 px. Ahora vayamos al tercer paso.
We will outline it with the option
ìinsideî with color 2 (darkest) to a thickness of 1 px. Now we go to the
third step.

|
|
 |
 |
|
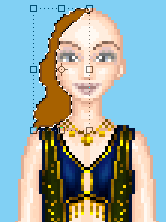
Seleccionamos con la varita m·gica
 y luego SelecciÛn > Invertir o buscamos la capa "Pelo" y botÛn derecho
"Seleccionar transparencia de capa" Con esto evitaremos no salirnos fuera
en el siguiente paso, cosa que para hacer una animaciÛn nos vendr· de
maravilla :)
We selected with the
magical wand
 and later Selection >
Invert/Reverse, or look for the layer ìHairî and right button ìSelect
transparency of layerî With this we will avoid not to leave to us was in
the following step, thing that stops to the transparent pixels and makea
possible animation will come to us wonder:) and later Selection >
Invert/Reverse, or look for the layer ìHairî and right button ìSelect
transparency of layerî With this we will avoid not to leave to us was in
the following step, thing that stops to the transparent pixels and makea
possible animation will come to us wonder:) |
Con el color, n∫2 seleccionado, con la herramienta pincel
 con un pÌxel de grosor y una
opacidad del 100% Con el pincel vamos dibujando las ondas del pelo
siguiendo la forma que hemos dibujado. con un pÌxel de grosor y una
opacidad del 100% Con el pincel vamos dibujando las ondas del pelo
siguiendo la forma que hemos dibujado.
With the color, n∫2 selected, with
the tool brush
 with a pixel
of thickness and an opacity of the 100% With the brush we are drawing the
waves of the hair following the form that we have drawn. with a pixel
of thickness and an opacity of the 100% With the brush we are drawing the
waves of the hair following the form that we have drawn. |
|
 |
 |
|
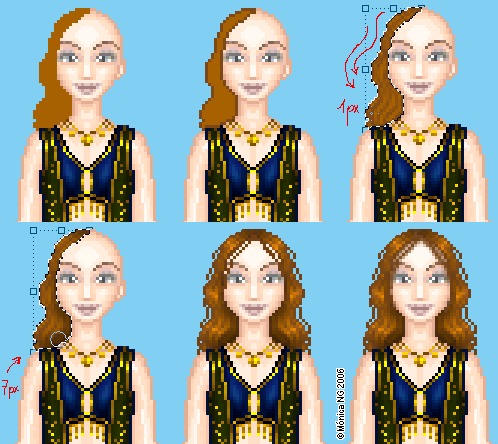
Ahora con el herramienta subexponer
 a un grosor de 7 px, con rango
de a un grosor de 7 px, con rango
de "medios
tonos" sobre el 30%, damos ligeros toques por las zonas donde deberÌa
haber sombras, la parte posterior del cuello y la parte superior de la
cabeza. "medios
tonos" sobre el 30%, damos ligeros toques por las zonas donde deberÌa
haber sombras, la parte posterior del cuello y la parte superior de la
cabeza.
Now with the burning tool
 to a thickness of 7 px, with "halftone
rankî on 30%, we give light touchs by the zones where it must have
shades, the later part of the neck and the superior part of the head. to a thickness of 7 px, with "halftone
rankî on 30%, we give light touchs by the zones where it must have
shades, the later part of the neck and the superior part of the head. |
Ahora tocan los brillos.
 Con la
herramienta sobreeexponer Con la
herramienta sobreeexponer
 , a
un pÌxel en el rango de "iluminaciones", sobre un 20%. Primero seguiremos
el trazo marcado por las flechas rojas. AsÌ conseguiremos un reflejo m·s
tenue. Para conseguir el brillo del pelo limpio y sedoso (estilo que me
atribuyo wijiji porque parece que esto "est· mal") con la misma
herramienta al 80% hacemos un r·pido trazo por la zona donde queremos m·s
brillo (color verde). , a
un pÌxel en el rango de "iluminaciones", sobre un 20%. Primero seguiremos
el trazo marcado por las flechas rojas. AsÌ conseguiremos un reflejo m·s
tenue. Para conseguir el brillo del pelo limpio y sedoso (estilo que me
atribuyo wijiji porque parece que esto "est· mal") con la misma
herramienta al 80% hacemos un r·pido trazo por la zona donde queremos m·s
brillo (color verde). Now they
touch the brightness. With the tool hightlight
 , to 1 pixel in the rank of ìIlluminationsî,
on a 20%. First we will follow the outline marked by the red arrows. Thus
we will obtain a more tenuous reflection. In order to obtain the
brightness of the clean and silky hair (style that I attribute to myself
wijiji because it seems that this ìis badî) with the same tool to 80% we
make a fast outline by the zone where we want more brightness (green
color). , to 1 pixel in the rank of ìIlluminationsî,
on a 20%. First we will follow the outline marked by the red arrows. Thus
we will obtain a more tenuous reflection. In order to obtain the
brightness of the clean and silky hair (style that I attribute to myself
wijiji because it seems that this ìis badî) with the same tool to 80% we
make a fast outline by the zone where we want more brightness (green
color). |
|
 |
 |
|
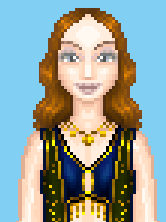
Ahora, le damos a Capa>duplicar capa, con lo que conseguimos otra capa
igual a la de "Pelo". Le damos a EdiciÛn>Transformar>Voltear horizontal.
°Ya tenemos la cabeza entera con pelo! >.<
Now, we give Layer> duplicate layer,
with which we obtained another equal layer to the one of ìHairî. We give
horizontal EdiciÛn>Transformar>Voltear. Already we have the whole head
with hair! >.< |
Ahora aÒadimos con el l·piz
 unos cuantos pelillos sueltos para darle un
poquito m·s de reslismo y aspecto desenfadado... unos cuantos pelillos sueltos para darle un
poquito m·s de reslismo y aspecto desenfadado...
Now we added with the pencil
 a few
strokes just a little bit to give her more of reslism and self-assured
aspectÖ a few
strokes just a little bit to give her more of reslism and self-assured
aspectÖ |
|
 |
 |
|
Suavizamos un poco las lÌneas con la herramienta dedo, y listo!! ya tenemos pelo!
 We smoothed a little the lines with the tool
smooth , and ready!
we already have hair! , and ready!
we already have hair! |
Estos son los pasos que hemos seguido...
These are the steps that we have followedÖ |
|
 |
|
Espero que este tutorial te haya sido de ayuda ^^. Si te ha gustado y lo
sigues, no dudes en hacerme link para que otras personas tambiÈn puedan
visitarlo! :)
I hope that this tutorial has been helped you ^^. If you liked it and you follow it, you don't doubt in
linking me so that other people also can visit it! :)
|
